2. Download the image in the version you require. You can view all versions here. Replace your version with <version> in the following command. If you want to use the latest version you can use latest for <version>.
					docker pull git.zabify.de/zabify/zabify:<version>

// or

docker pull git.zabify.de/zabify/zabify:latest
3. Once you have successfully downloaded the image, you can start it immediately. To do this, execute the following command as an example. This starts the container under the name you have selected with the minimum configuration.
4. To make sure the server executable is callable we need to go into the running container. Use the following command to get access to its shell.
					docker run --name your-zabify-server-name \
        -p 80:80 \
        -e PORT=80 \
        -e USE_HTTPS=false \
        -e ZABBIX_SERVER_URL="https://your-zabbix-server.com" \
        -d \
        git.zabify.de/zabify/zabify
docker exec -ti your-zabify-server-name /bin/sh
5. To make sure the server executable is callable check the output from the following command. It should print out some version information.
./server version
6. Next we will send a test push notification to a test device. Fill the needed data in <>-placeholders with real data. If needed you can call zabify server test --help to get a list of every option. You can go to your Zabbix Dashboard and search for a current active or historical problem. From their you can inserts the details into the command. Alternatively you can insert random data, except for the sendTo-parameter. If you use random data you can’t open a problem by pressing on the received test push notification later. The token for the sendTo-parameter can be get from the Zabify Pro app from your test device, to which the push notification should be sent to. To get the needed token open the app, go to settings > server overview. At the bottom you will find the entry Zabify push-notification token. There are multiple ways provided to retrieve the token. Use one and insert the token value into the sendTo-parameter. After executing the command you will se some logging. If an error occurs you can find more informations about it in the printed logs. If no error message showed up the push notification should be received shortly after executing the command. Depending on the os and settings the push notification can be received later and not instantly. If no error showed up but no test push notification popped up on the test device make sure the right push notification token was used. If it was the correct token check your settings on your os which could prevent your device from receiving a push notification.
					./server server test \
        --config-file /home/zabify/configuration/zabify.conf \
        --no-file-log \
        --severity <severity-level> \
        --hostID <host-id> \
        --eventID <event-id> \
        --sendTo <sendTo>
So far we have used a minimal configuration, which may not be sufficient for you. You can find further setting options and examples here. Please bear in mind that all server configurations are defined via the environment variables that can be specified when starting the image.
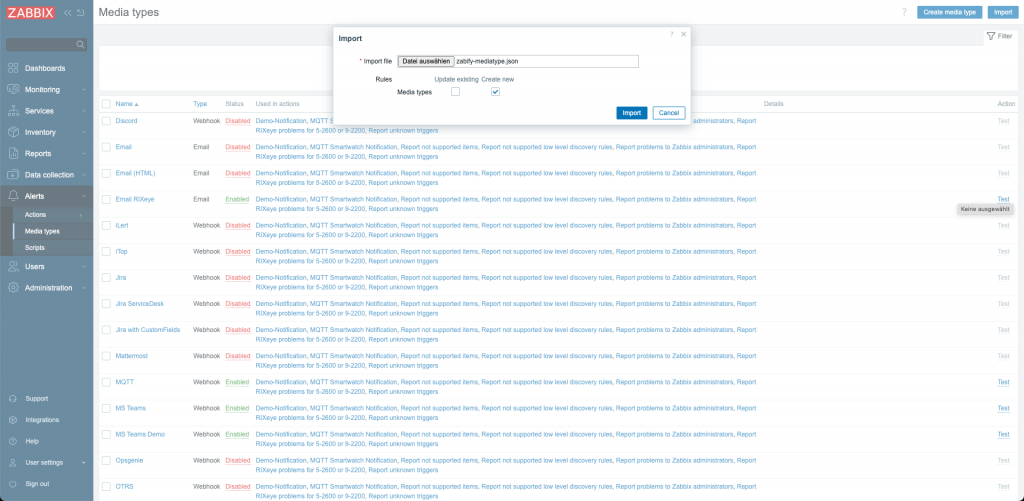
7. Import the mediatype in your Zabbix web frontend. Make sure the values for the keys „protocol“, „fully_qualified_name“ and „port“ are defined exactly like the Zabify push notification server was configured. If you need you can set your proxy configuration in the value for „proxy“ to use the provided proxy to send the data to Zabify. Also make sure the client on which the Zabbix web frontend is running trust the Zabify server certificate if it uses a self signed https certificate. This can be done by setting the ca certificate as trusted via the os settings.

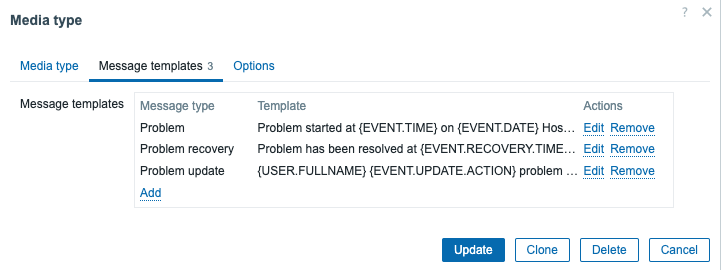
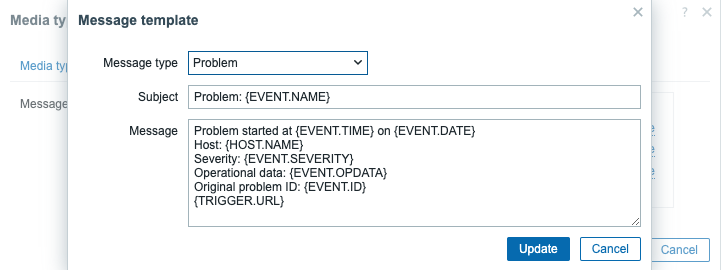
8. Add message templates as needed with the information you want to receive via a push notification.
9. Add and or update existing rules to use this media type like every other media types.